Sunday, July 10, 2011

It's finished.

Today was a perfect evening for Cub flying, my friend Scott flew the airplane while I got some movies. The sun was going down and I did not know how to trick the camera to work into the sun. The movies start out dark then get OK when I turn away from the sunset. Here he is taking off.

This is proof that it actually flys. Here is a low pass.
He finished off with a near perfect 3 point landing.
On Satruday I flew down to Wakefield and flew the Trojan for a few minutes. Here is a shot of the planes together.

Friday, July 8, 2011

Po Boy Preoiler

Since I did not take many pictures, it's hard to describe the work that took place between the 18th and the 23rd. It is amazing how much work you can get done without the great time waster(computer). I would be at the airport at 8 AM and would not get home until 8 PM , or until I ran out of water. I completed the cowl mounting and installation, the breather system, the exhaust system, all the heating and ventilation ducting, and the ignition system. I came up with a new strategy for visitors,  I would stop working and set down my tools , 9 times out of 10 after 5 or 10 minutes they would realize that they were hindering progress and leave. I never came up with a good answer to the inevitable question that only people that have never built an airplane ask, "when will it be done"? With all the systems complete it finally came time for the flame test. I like to pre-oil my engines before the first start and depending on the method used this can be a messy task.  I had been thinking about this since we did Scott's Dream Machine motor where he pumped oil in the pressure line with a old oil pump can. I came up with this brain storm that I call  the Po Boy Preoiler !
You can see , it's a length of 4 inch pvc pipe with one end a cap and the other a sewer clean out cap. I drilled and tapped two places for 1/8 pipe thread fittings. The top hose terminates with a Milton #2 air  fitting and the lower goes to a 3/8 pipe plug that screws into the front engine gallery. Here is a better picture of the engine fitting.
This worked great, unscrew the top, make sure it's perfectly clean, pour in a quart of oil, connect an air pressure source of 20 psi and wait. I pumped in an entire quart and as soon as air showed in the line I disconnected the air. This fills the entire oil system before start and gives you a test of the oil pressure line and gauge since it should read the air pressure applied. The only mess comes when you remove the fitting and install the regular pipe plug.
With this complete it was time for the flame test. I called my friend Claude and he did the cockpit honors while I pulled the prop and watched and listened for problems. The first run was 5 minutes @ 1000 rpm per Continental instructions.

 Here is the happy owner just after the first engine run.  Check out those old man boobs I'm growing! Another 10 years and I'll have to start getting mammograms.
That evening I came out and completed the second run of 7 minutes, that included a magneto check and a short static runup. Everything checked out and she is ready for a test flight when the weather conditions are just right. Here are a few shots of her on the evening of the 23rd. Not perfect but not bad either.


The plan was to come out early Friday morning when it was cooler and complete the first flight, however I worked so hard on Thursday I could not muster the energy to get up that early. The first flight was completed on Friday evening .

Wednesday, July 6, 2011

I'm back

The new Dell arrived today and it's up and running. The Cub is finished and flying and I have about 12 hours on it now. The first flight was on the evening of June 24, 2011. I flew for 1 hour and everything went smooth. I have had some problems during the test period, but they are slowly getting worked out. I will go back to June 18 and pick up where I left off. With the computer inop. I did not take as many pictures as usual so it will be a little jumpy. When I left off I was waiting for the magneto drive seals to arrive. I installed these and finished the magneto overhauls . Here are a few shots, the first is during setting the "E" gap (point gap) using the Bendix tool.
In this shot the mags are ready for installation, I ended up using the old harness from the Champ engine. The blue leads really do not look that bad. You can see the Lone Star Aviation magneto filters installed to reduce ignition noise from the radio, more on that later.
At this point everything started to come together and I was working at the airport every day. Here is a shot of the left side with the mags , exhaust and lower cowl installed. I have one plug in and I'm fitting the eyebrows for the ignition leads.
In this shot of the right side you can see the eyebrow fitted. I made a mistake here in that the test engine had flat valve covers and these are the flanged type. There were some areas where the eyebrows rubbed on the valve covers, so they had to be relieved for a little clearance. I managed this without messing up the paint too much.

 Here is the exhaust pipe fitted. It's a little closer to one side but not too bad.
The air filter fits good should not be any problems with rubbing here.
I had to manufacture the left front cowl pin mount. The one I bought from Univair was for a C-65 engine and the crankcase is different on the C-85/90 engine. This left pin bracket sets the cowl location and the right pin is free to float for alignment. It took some time but it came out pretty good.
Here's a few shots of the cowl fitted. I still need to finish the eyebrows, run the ignition leads, finish the "P" leads, and make the breather tube plus a 100 other items.


Wednesday, June 22, 2011

Almost there

Sorry for the lack of updates, my old Dell decided to pack it in. My friend Scott loaned me his old Dell and I did some troubleshooting. Thank goodness the hard drive still works, the power supply is OK, so I guess something crapped out on the motherboard. With the Cub this close I just don't want to waste the time shopping right now.  The Cub is complete except for the breather tube and the front cowl pin bracket needed to be modified . I finished most of that tonight and I hope to have it running tomorrow. Sorry no pictures, not going to waste the time to sync my camera to this 2002 Dell !

Wednesday, June 15, 2011

Magnetos

I thought I had two fresh overhaul magnetos to install however I was wrong. The project came with two magnetos that had Savage Magneto stickers on them and they looked great. I decided to disassemble these for inspection and fresh grease, that's when things went downhill. The first mag had a damaged drive end bearing race and a worn out front case. The second was not as bad but had an obsolete distributor installed. Here they are disassembled.
  Yes , I think I can get these back together.
I ended up disassembling two more magneto cores I had in stock to get enough parts to build two good mags.Here is a shot of the drive end bearing race, looks like it might have been assembled with too much bearing pre-load? This requires a special bearing puller that I do not have(yet).
 The two Savage mags did have updated impulse couplings(snap ring style) That is a real plus.
This operation really took some time because I had to constantly review the manual. Would have been an easy job if I did it everyday. I still need to replace one drive seal and the part will not be here until Monday. I did manage to get them put back together.

The mag on the left is an old 51360-1 , looks a little rough but is in great shape inside. I will probably exchange the other two mags for Kelly Aerospace rebuilds, then keep these for spares. Sure does not look like 3 days work, well 1/2 days, it's yard work season.


Sunday, June 12, 2011

In with the new

After the thunderstorms last night it was a beautiful morning today. The help showed up at 9 as arranged and we loaded the engine in the truck.
 We just removed  the bolts and laid it over onto Lynda's old seat cushion upside down.
Here it is ready to leave the shade tree engine shop.
 At the airport we put it right on the engine hoist. Here is the moving crew, JD , Scott , and you can see Buzz's foot.
So I had to take another picture.
I had everything ready so we hung the engine on the airframe. The sun beats in the hanger door in the morning so we knocked of till the afternoon. We got the engine mounted and the mount bolts torqued.

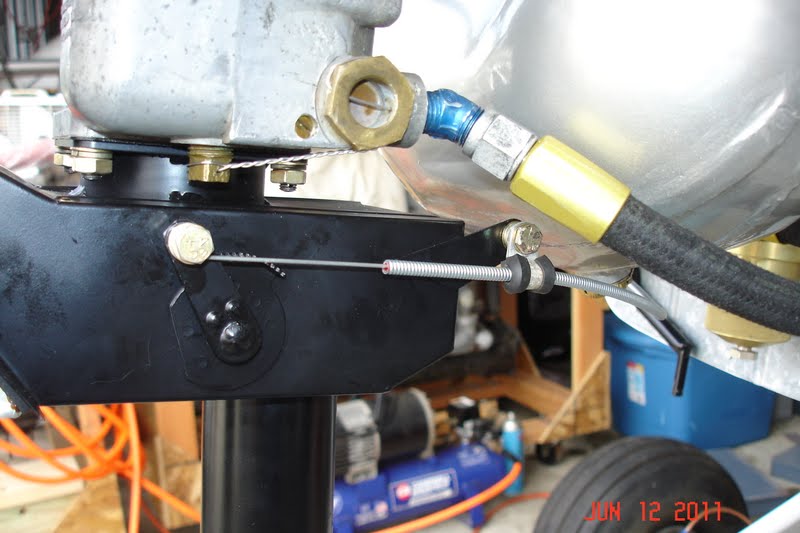
After  a couple hours I went back out and started hooking up systems. I finished the throttle and it works really smooth with the new rodend bearing. I may look for a slightly smaller safety washer but this one works fine.
I had to put some chafe protection where the throttle rubs on the bottom of the oil screen. This is a common problem area on Cubs. This shot is a little blurry but you can get the idea.
After this I completed the oil pressure line and installed the tachometer drive.

Then I completed the fuel system, the fuel line could have been an inch longer but this will be OK for now. With the fuel on no leaks noted.
The wire you see coming out of the cabin heat box at the far right is for my JPI digital tachometer. It has a pickup that screws into the magneto vent location and counts magnetic pulses. I will use this to back up the mechanical tach for the test flights. It runs on a 9 volt battery.
I installed the primer line and this completes the fuel system.

You can see that I also installed the carburetor heat control. I will search tonight for an all metal clamp for this location, I do not like a rubber cushioned clamp here. This cable will probably have to be moved around to clear the exhaust so this is just temporary.
I also got the cotter pins in all the engine mount bolts and installed the Brackett Air Filter. I installed the eyebrows but they rub slightly on the rocker covers and will need to be modified. I marked them and will work on them tomorrow morning . It is supposed to cool off for the next 3 days, hope to get the exhaust and cowling fitted.

Saturday, June 11, 2011

Out with the old

Today I cleaned up a few last details on the engine before it goes to the airport. I installed the inter-cylinder baffles , fuel fitting, primer fitting, and oil pressure line. The help is scheduled to show up Sunday at 9 to load the engine in the truck for the trip out to the airport. This afternoon I went out and removed the fit up engine and completed a few details on the airframe. Everything is ready for the installation tomorrow.


Weather permitting the flight engine should be installed tomorrow.

Friday, June 10, 2011

Perseverance

Last night I baked the lifter covers in the oven and they were ready to install this morning. Since my lifters have the snap rings installed, I ground out some of the tab in the replacement covers. I did this free hand with a 5/8 inch carbide burr, so they are not all even.
Here is a shot of the inside, should be no interference now.
I installed these on the crankcase and I was back to the point where we started on Wednesday at 9 AM!!
My friend Scott showed up at 9 and we installed and torqued the cylinders. With all the practice we had that complete by 10. The rest of the day was spent installing the intake system and cleaning up a bunch of details.
Here are some shots I took at the end of the day.

If your wondering about the carburetor , I plan to build up another when I find my tub full of Strombergs. I want to see how this runs with the 44 main jet and the 55 main air bleed. It ran great on my Champ , but they can be finicky sometimes.
The engine is ready to go to the airport tomorrow, if I can find two helpers without bad backs. In the morning I will load up all the tools and hardware for the trip out to the hanger. The oversize pushrods will not be available until next week so I have some time to finish the installation. Should be running late next week or the week after for sure.

Thursday, June 9, 2011

Revelation

Started today by removing the #1 cylinder to try and determine just what I had done wrong. After removing the lifter cover it all became obvious. Check out these pictures.
The top cover was on the engine, the bottom one is a spare. Notice the design change. The upper lifter cover has two tabs per hole while the older lower one only has one outer tab. Here is a shot of the inside.
This must have been a design change to correct the deficiency that I mentioned yesterday. The one outer tab did not prevent the lifter socket from coming out of the lifter body. Here is a picture of the outer end of the lifter body. Inside here is the hydraulic lifter and the socket that mates with the pushrod.
With the engine assembled , if you pull out the pushrod for some reason(stuck valve) the lifter socket can come out and fall into the area inside the cover. The inside is the perfect size for the socket to fall in sideways and the next time you turn the propeller it bends and cracks (it's cast) the end of the tappet body. The only way to fix this is to completely disassemble the engine. You will only do this once, it is a painful lesson. I guess the two tabs are an attempt to correct this problem. These are Superior lifters and they have a snap ring groove you can just see. The snap ring prevents the socket from coming out of the body. The parts manual shows this snap ring , but I guess that Continental cheaped out for awhile and eliminated the snap ring groove and hence the problem.   To fix my problem of the pushrod rubbing I decided to remove all the new style covers and install the older style covers. I went through my spares and selected 4 I liked. After a trip through the solvent tank, a few glass beads, alkaline wash, acid etch, and some alodine they were ready to paint.
You can see that I also prepared the inter cylinder baffles. Since it was 95 degrees,  I'm painting in the shade tree paint booth today. I am lucky to have college students for neighbors and not some Weiner!  I have been running a paint test on the Stits epoxy primer and the Aerothane. When I primed the cowl back on May 19th I put the remaining primer in the freezer.  I shot the Aerothane on May 22 and did the same. When I took it out today  the Aerothane had cured into a rubber hockey puck.

However the epoxy primer had settled and needed to be mixed but was still in useable condition.
This is sweet, I can mix up a batch of paint and when I need to paint just a few parts it is all ready to go after it warms up. When I shot the primer I could not detect any difference it the way it went on or cured. Here are the parts all primed.
I let all these cure while I had dinner and then I went out and shot the Continental gold engine enamel . I know this was a lot of work but the rest of the engine got this treatment so I just could not half ass these. They came out nice.
After I remove the tape I will bake these in the oven for a little while.
Tomorrow, Scott is coming by at 9 and we will install the cylinders before it gets too hot.  Personally, I will  take too hot over too cold any day, water and air-conditioning are cheap compared to heating. I'm just glad I don't have a fur coat. The Bobcat did not get far from the water today.