
Tuesday, May 31, 2011
Ground Hog Day
Today was a complete do over of yesterday. The scraping noise turned out to be a small aluminum burr on the camshaft thrust bearing surface on the crankcase. With that dressed out, I then had to remove all the old sealant, clean everything again and then reassemble. I am back to this point with the peace of mind of knowing it's right.

Engine assembly
I ended up taking the weekend off from the Cub, but put in a full day on Monday. I started with installing the new data plate on the crankcase. This was a slow careful process as you have to drill the 6 #51 holes for the drive screws 0.190 in depth. With that completed I bolted up the case and checked CSI's work on the line bore. My Chinese micrometers and bore gauge measured it out to within a 0.001 of spec, but it never hurts to check. With one final cleaning the case was ready for assembly.
 I then measured the crankshaft before installing the connecting rods. I had done this before but somehow lost the paper I wrote it down on. I measured the rod journals then set my dial bore gauge from the micrometer , that made it easy to to measure the rod bearing clearance.

 No, I did not pull a Don, Superior made these bearings mechanic proof. They put the oil hole in all of them! I ended up putting in new rod bolts and nuts, I just did not like the old ones that came from Gibson Aviation. I will use those in a 65 since they only have 47 hours on them. I then installed the rods, torqued the nuts, and installed the cotter pins. The crankshaft is ready for assembly. Along in here I just started working and forgot about taking pictures. Needless to say there is a lot of work to get to this point, here is the 2-4 side ready for sealant and thread.
 The camshaft and lifters are installed and lubricated. The main bearings shells are installed along with the thrust bearings and the crankshaft nose seal. In accordance with TCM's latest SB this side gets a thin coat of Permatex 3D, just enough to hold the sealing thread. This shot shows the thrust washers and nose seal.
 The 1-3 side gets a 0.010 coat of Loctite 515, not sure about the mixed sealant but that is what they call for. I think when I did the Trojan engine 10 years ago they only called for Loctite 518, because I had to special order it and I still have it. Not sure why they changed, the Trojan has not leaked a drop in 10 years. Here's the 1-3 side.
 You can see the cut off starter pinion installed at the right . In this shot you can see the camshaft thrust bearings, more on this later.
 After a few hours work we end up with this!
 Here it is with the through bolts and flange bolts torqued. Next comes the gears and rear case, then the cylinders. Unfortunately, at this point I noticed a unusual scraping noise when the camshaft is rotated. I decided to sleep on it and check it again in the morning.


Saturday, May 28, 2011
Details
Friday always seems to be a busy day for visitors at the Airport. I got distracted early by a request for some A65 pushrods and progress slowed to a crawl. I did get the skylight finished with all the help available, and installed the cabane cover plates that I spent so much time on last winter. This completes the windows.

 I spent a little time cleaning off the finger prints and polished all the windows. Through pure luck they all made it through the installation phase scratch free. The windshield is a beautiful piece of molded plastic, clear and distortion free. I then marked the cowl for installation of the chafe protection and removed it. I still need to complete the mag wires, throttle installation, breather, carb. heat. and primer line. I also had visitors with cameras , here is a shot of my head working on the throttle. They have overstayed the 10 minute limit.
 Not much progress, but even at this rate it will fly in June!(I hope)


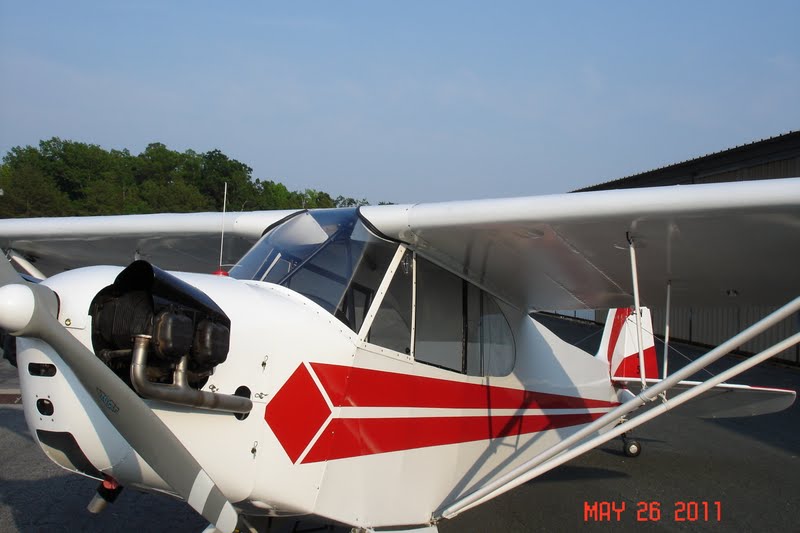
Thursday, May 26, 2011
Fairings Complete
Started today working on the engine. I cleaned the crankshaft, rods, rod bolts and nuts, and the lifters prior to assembly. This weekend when my town is overrun with people( what recession?) I will be assembling my engine. Since they subsidize my taxes I try to stay out of their way! After lunch I went out to work on the airframe. I started by installing the stupid customs placard on the tail, of course the first spot I selected had a piece of tubing behind the last hole I punched ! Here it is, the tape is covering the extra hole.
 There is a 0.025 doubler on the inside, that's as permanent as it gets on a fabric covered airplane. After searching the web, it seems the FAA refuses to enforce this requirement for the customs service. Next I hit the wing fairings and the skylight hard and except for a few details it is finished. There were a few screws I could not tighten with out help. It was late evening when I finished so I had to roll her out for some pictures.
 I still need to install the sheet metal covers over the cabane structure after I get all the screws tightened. I had to install a few rivnuts where the screw holes were really large. I ended up with just 1 #10 screw where there was not enough edge distance for the rivnut. I'm not fond of rivnuts but it was my only option here.
 Here is a shot of the smoked skylight, I think the dark spot in the center is the reflection of the prop because there is no gap there.

 Here is a shot from the inside, looks good.
 Here are a few shots while it was outside, I think she looks pretty good!


 Still a lot of details to complete, but I can see light at the end of the tunnel!


Wednesday, May 25, 2011
Final Assembly
Sorry got sidetracked yesterday with some garden chores and did not get a whole lot done on the Cub. My friend Matt came by and helped me put the grommets in the cowl. I decided to leave these the natural brass color so when they need to be replaced I can just grind the old one out and put a new one in without repainting. Today I worked at the airport, I started with the placards on the struts for AD compliance. This completes the wing strut AD for the next 2 years .
 The rear strut placard is closer to the front because the door rubs the strut a little and there is a strip of clear plastic tape to protect the strut paint. I then worked on the wing root fairings, some how I forgot to take out the skylight so this did not get completed today. I finished the top aft and the two bottom sides.
 Here is the right side.
 And the left side, they came out pretty nice.
 I was finished here for the day so I did a check fit on the exhaust and cowl. I Emailed Clyde yesterday to see which way the exhaust pipe 45 degree cut off tip faced. Some airplanes like the Cessna 150 have this face into the wind while the Cub faces aft. Everything seems to fit just fine.
 With this fitting I should be able to figure out where the anti chafe strip needs to be installed. Here's the other side.
 In this shot you can see the grommets installed, I think they look OK natural finish.
 Tomorrow I will work at home on the engine in the morning when the sun is beating in the hanger door and after lunch will work to finish the skylight and wing fairings.


Monday, May 23, 2011
Housekeeping
I spent the day cleaning up and transforming the paint booth into an engine shop. With the cowl dry, I set it up outside to cure in the sun. It has a little trash but overall came out OK with good gloss.

 I put all the other parts into my outdoor drying oven. Here check it out, works for free.
 That's the black plastic bed liner in my truck, makes an energy efficient drying oven. Here are the leading edge fairings , the muffler shrouds, a few other muffler parts and the spinner. Not sure what I will work on tomorrow, I do know it will not be painting! Check in tomorrow for progress.


Sunday, May 22, 2011
Painting Completed
Took a couple of days off from the Cub for other errands. Today I put in a full day of painting. I started with the remaining wing leading edge fairing. I shot that with a couple coats of regular enamel paint. I then went to work on the cowl. I started by pushing a little lacquer spot putty into the voids around some of the rivets and patches with a rubber squeegee. I allowed this to dry during lunch then wet sanded it all smooth. Here it is all sanded.

 After sanding, it got a good blow dry, a wipe down with 2210 cleaner and a tack rag just before paint. I mounted these on some old boxes I had around , it is much less difficult when your only painting one side.

I also added a sheet of plastic above the parts and sprayed the floor with water just before painting.
 It was time to mix paint and I almost thought the day was over when I opened the can of activator. The Aerothane mixes 3 to 1 instead of 2 to 1 like the primer. I had 2.5 oz of activator so I used 7.5 oz of base component. Once again I followed the directions and had no problems. The only down side to this paint is you have wet paint for almost 2 hrs while you wait 30 minutes between coats. I don't care how careful you are your going to get some trash/bugs. Overall it came out pretty nice.
 Ya see that black spot next to the Carb. air intake ? It's this little guy.
 I thought about picking him out but have never had good luck at that. I will just brush him off tomorrow and polish it out in a week or so.
 You can still see the patches if the light is just right. It will be just fine for the beater Cub. The top came out good, could have a little more gloss but my light was not real good so I did not put the paint on as heavy. There is a fine line between just right and too much.
 That was it for today, this week will be assembly work at the airport and engine assembly at home. I am just glad to be done painting, here is the BC checking out my "new" white shoes! My paint suit covers everything but my shoes.


I also added a sheet of plastic above the parts and sprayed the floor with water just before painting.


Thursday, May 19, 2011
Painting Day 4
Today was a marathon painting day, started at 10:30, short break for lunch and finished cleaning the gun at 8 PM. I started with the leading edge fairings, I had stripped the left down to the epoxy primer and sanded the right smooth. I shot these with a single coat of single part enamel paint. The left came out great, but the right one lifted the existing paint. I ended up stripping that one down to the epoxy primer using the reducer as before.
With that complete, I searched my stock and found a really nice skull cap spinner. I thought a white one would look better than a polished finish. Of course it was red so it had to be stripped and preped for paint.
I then started on the cowl. My original plan was to paint the inside flat on the painting screen, then flip them over onto some old boxes for painting of the outside. The inside paint went smooth, but I came to realize the paint would not dry quick enough for the box idea. I ended up hanging them via safety wire from the ceiling joists and tying them to the painting screen for support. This worked really nice. Here are a few shots.
 The vertical position virtually eliminates trash in the paint, but is more susceptible to runs and sags.


With that complete, I searched my stock and found a really nice skull cap spinner. I thought a white one would look better than a polished finish. Of course it was red so it had to be stripped and preped for paint.
I then started on the cowl. My original plan was to paint the inside flat on the painting screen, then flip them over onto some old boxes for painting of the outside. The inside paint went smooth, but I came to realize the paint would not dry quick enough for the box idea. I ended up hanging them via safety wire from the ceiling joists and tying them to the painting screen for support. This worked really nice. Here are a few shots.


With these suspended like this the edges were real easy to paint. I did the edges first then shot the three coats as per the directions. They came out OK but will need a little spot putty around a few of the rivets. The Stits primer is essentially insignia white. Here they are all primed.

Like I said the rivets and the cracks will need a little work.

I will probably have to let this dry for a day before I fill these and paint the Insignia white Aerothane. Overall I think it will look OK. Here are some more shots.


Sure will not be any problem spotting oil leaks!

The top cowl came out pretty nice too.


One more day of painting should do it! Depending on how this cures , I may finish tomorrow. Since I finished so late it may need a day to cure properly for filling and sanding. If that is the case I will start assembly of the wing fairings tomorrow .
Subscribe to:
Posts (Atom)